Case Study - Making Maze Art in 3 Different Difficulties

I want to take a deeper look on creating mazes at different difficulty levels with a case study. I have looked at this topic before where I discussed ways to change the difficulty level of a maze. Here is some pre-reading if you want some background on the topic:

Maze Design Case Study - Designing a Grid Maze in Different Difficulty levels

Maze Construction - 5 Maze Design Decisions Make All the Difference

This version will take a specific maze and I will make in 3 different difficulty levels. I choose the Rock n Roll Hall of Fame Maze (my 2022 maze of the year) to work with, mostly done in black and white to more easily show the work, and zoomed in to focus on the maze portion more than overall picture. The maze is a bit longer and larger than I would like, but it works. All 3 options can be downloaded to make solving easier. The best way to experience and understand this post is to download each maze and try to solve it !

Option 1: Can you tell what difficulty level this is ? Try to solve half way to get an idea.

What did you notice ? Hopefully that this maze was relatively easy. Any incorrect branch was short (typically 3 panels) and had no branches off of it. There are no 3 choice blocks in the maze. It is not quite kids maze easy because the maze is too long…but a more compact version of this could be.

Option 2: Same deal. Try it. Go half way or farther this time.

What I hoped you noticed was this was a bit more difficult. Now, if you took a wrong branch, that branch also split in 2, so you got deeper into a bad pathway. But, I kept the branches relatively short, so things don’t get out of hand. I consider this medium difficulty.

Option 3: You know this one is the most difficult, so try to solve the entire maze this time.

In this maze I used almost all of the full picture and have branches off branches, longer branches, and some long wrong turns. There are also a few places where 3 options are available to move. This could be made even harder, but compared to options 1 & 2 this works.

Now, let’s get under the hood and make this a case study by marking the pathways based on what their purpose is from the designer.

Red - the pathway solution !

Blue - incorrect pathways

Purple - filler pathways that are not reachable by the maze solver

Green - incorrect pathways that branch from incorrect pathways (very wrong turns)

Orange - incorrect pathways added to fill in blank spaces (replaces purple filler in this example)

Option 1 with branches shown

Blue pathways are short (although there are many of them) and none of them branch out. All purple branches are unreachable and filler. This is what an easy maze looks like. You could remove the purple pathways, but it would make the maze look uneven and the pathway more obvious.

Option 2 with branches shown

Same solution, but some of the blue pathways branch out into additional options (shown in green). This is a medium difficulty. I kept the incorrect branches relatively short again. So, blue is a bad path, and green is a very bad path !

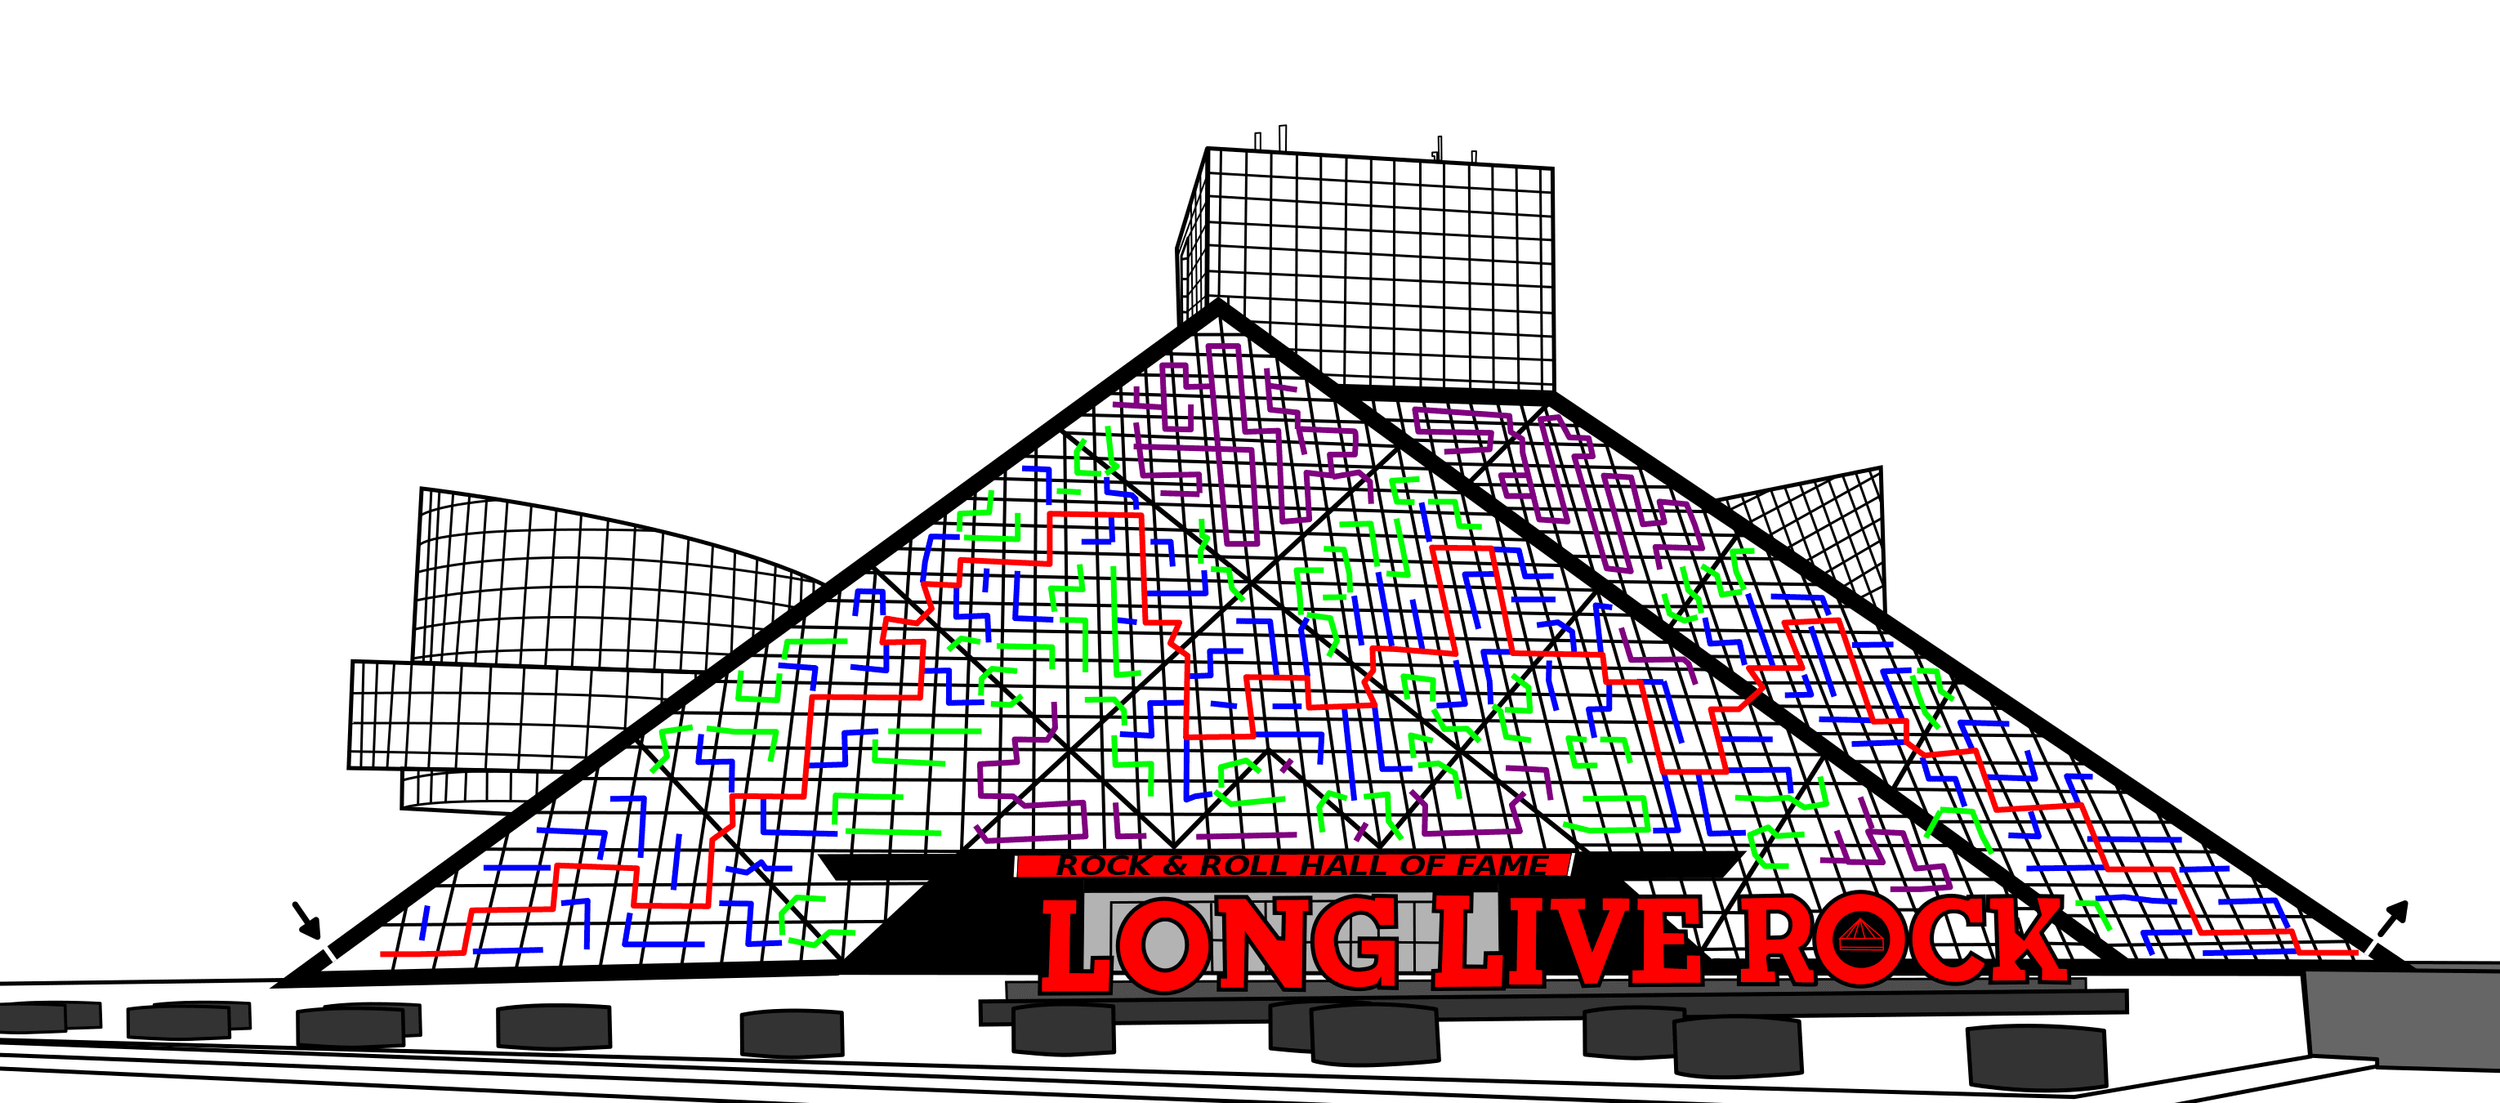
Option 3 with branches shown

The hard maze. All purple filler has been replaced and any pathway shown can be reached by the solver. Wrong pathways can be taken for longer (especially if you take the orange pathways at the top of the maze).

So that is 1 maze done in 3 difficulty levels, but all with the SAME correct solution !


So to summarize I used the following to change the difficulty of the maze:

  • The length of dead ends - How fast you know you have made an incorrect choice

  • Dead ends with branches - When you make a wrong turn are there multiple incorrect choices on that branch (branches off of branches)

  • Expanded pathway choices - Some intersections have multiple choices, instead of only 2

  • Unusable pathways - Filler sometimes was used to fill a maze out while keeping it at the desired difficulty level.

  • Choices Made - the more choices that need to be made, the more likely the solver makes a mistake.

Let’s look at that last item - choices made - with the same mazes but some data to back it up. In our easy maze example how many choices did the solver have to make ? 85 ! That explains why this wasn’t a kids maze. You would never have a child make that many choices (even an easy maze with 85 is pushing it!). Below I have labeled the 85 instances with yellow circles:

And now our hard version maze. The initial number of choices off of the main branch is actually less than the easy version - 79 (shown counted in yellow again), but those branches also have choices - 121 in fact (shown with aqua circles). So 200 total possible choices. However, the number of choices a solver makes will vary based on which decisions they make off the main branch. You would have to be terrible at solving mazes to make all 200 !

Good luck with your maze designs !

If you like reading content like this check out my master list of case studies:

A Collection of Maze Design Case Studies to Improve Your Mazes

12 Maze Art Ideas : Unlocking Creative Possibilities

What I've Learned Making Mazes

Maze Comic Book Cover #55 - Hop to It!

Issue #55 in my comic book cover series is called Hop to It! and features a new maze of a Kangaroo. The background features a bonus maze I made many years ago but never used on the site of a great sign you would find in Australia. My comic book cover mazes can be found in 2 places:

Comic Book Cover Mazes - Year 1 (Issues #1-53)

Comic Book Cover Mazes - Year 2

This the second comic book in the yearly series. I hope you enjoy them !

To receive a book of my first year of comic book book mazes (Volume 1 with mazes #1-53) you can sign up for my book alerts - any time I launch a free maze book, or paid book (on Amazon), I will send you a note about the new book launch.

Maze of the Week 42 Redux - Sydney Opera House - (MOTW #159)

The Sydney Opera House Maze is one of my most popular mazes and one of my earliest. I have been looking wanting to update and improve it for a long time, but I knew it needed a lot of work. Well, I finally went for it and made it into MOTW #159 . Below is the case study showing what changes I made and why. But first, here is the original post for the maze:

Maze of the Week #42 - Sydney Opera House Maze


Here are the enhancements I made to improve the maze:

1. Changed the size. The original size was a very large 27 x 40; I reduced the height to change to 18 x 40 to better reflect the maze size and eliminate empty space. Still large.

2. Changed title font size. It was changed from 40 to 64 but I kept location font the same size so the title is featured vs the location.

3. Changed font color. I changed the titles from black to white based on a change below….

4. Re-oriented the maze. The new size also meant the Opera House would look better by moving it lower on the page and to the right.

5. Extended the building. Previously the building stopped on the right side, but now it more accurately flows off the page on the right side.

6. Added water. I added water with waves so the SOH wasn’t floating on the page any longer (and led to me changing the font color)

7. Added water stain discoloration. The bottom of the sea wall that surrounds the opera house is darker from the water and I added this detail.

8. Changed Start/Goal. I switched to an internal Start and Goal. Create a new maze !

9. New Maze. I switched the location of the start and goal to remove the portions in the base which was too easy and boring. So there is a new maze…actually…

10. 2 Mazes ! Much like the Taj Mahal, the space led to making multiple mazes in the same picture, so you get 2 for 1 mazes now !

11. Color Changed. I changed the color of the roof panels from black to brown to be more accurate - because an even more accurate lighter color does not show maze well enough. I also changed the roof color from white to pearl to be more accurate.

12. Added a reflection. I think any time you can add a reflection in the water, and can do it well, you should do it. It really elevates the maze.

13. Pathway Improvement. I increased pathway width from 3 to 4 (+33% larger) to make solving easier and more enjoyable.

14. Added shadows. Mostly along the roofline and around awnings.

15. Added a shoreline. Because there is one IRL.

So that was a lot. I hope you agree the improvements were worth it ! This is a very large maze so the bigger the screen you use to view it the better !

Huge improvement. Well worth the time I spent updating.

Some data: The new file is 386MB from 307MB.

I will be replacing the homepage with the new maze going forward. You can find the maze download there !

If you like this type of content check out all of my case studies:

A Collection of Maze Design Case Studies to Improve your Mazes

Happy maze-ing !

What I've Learned Making Mazes

I have been making mazes since I was a kid with decade long breaks along the way to today. I got back into making mazes again about 10 years ago and started this website over 5 years ago. Along the way I have learned some lessons about maze making that I want to share with you. Hopefully some of my insights can help you.

10 Things I’ve Learned Making Mazes:

1. No matter how many mazes you make, you will always make more mistakes.

Sadly, the more experience you have does not mean you will stop making mistakes when you draw a maze. Yes, you know the rules and best practices, but mistakes still happen. I made a few blog posts about my mistakes if you like observational games: Can You Find the Maze Design Mistake ?.

2. More time does not always mean a better maze, but it usually does.

I used to make daily mazes for the site. Now I maze weekly mazes. Spending a few hours on a maze, a week, or a month leads to different final products. More time = better maze. Here is my example my mazes of The Alamo. The first was a quick maze I made for kids. Then I spent the time to make it in detail (I think it took a few weeks).

3. Maze fun-ability is important

If you want people to enjoy your mazes, you need to be smart about how you design them. A maze that is too hard to solve with long dead ends is not enjoyable for the solver. Think about it like a video game. If a video game is too hard, you give up. But if a game is too easy it isn’t fun. Same for mazes.

4. The maze subject is very important, especially for maze art

I used to seek out buildings that I knew would make a good maze. But the average person does not care about a random building in upstate NY they have never heard of and will never visit. A great looking maze of a random building has a very small audience. Better to make mazes of things people know. Which of these mazes is more popular do you think ?

5. The largest maze audience is kids

My research has shown that kids ages 5-12 are the main maze enthusiasts. So, designing mazes that that audience will like is important when you think about publishing books or making a website dedicated to mazes.

6. The more mazes you make, the better you get

Along the way I have learned how to make textures, use shadows, and overall become a better maze designer. Hopefully I have learned form my many mistakes.

7. A maze you make digitally is never done

I used to hand draw all of my mazes, but now I use Inkscape to digitally make my mazes. That means as I get better making mazes I can go back and review my old mazes and make updates. My Templo de Sangre de Cristo Maze is a good example. I went back and colored it, and added shadows. I think both improved the maze ! Each of these would have been difficult to do with a hand drawn maze. I can’t imagine making a nice hand drawn maze and then messing up the coloring and ruining it (see #1 above).

8. AI can’t make mazes (yet)

I use AI almost every day and enjoy text to image generators. I have been testing them on making mazes since they became popular. So far, they cannot make mazes (or maze art). What I learned using AI to make maze art

9. Changing maze types is fun

I like to change things up and try different make styles and types. When I was a daily maze website that meant different types of maze puzzles. You can find most of them made into free downloadable books. I have how to make a maze instructions for over 40 different maze types. How about a large pipe maze or an arrow maze ?

10. Details improve a maze

This is really a part of #2 (more time) and #7 (digital mazes). The more details I put into a maze the more interesting it is (or realistic it is). This really improves the maze. Shadows are my secret ingredient. Case Study #11 - Making Mazes with Shadows

I’m sure these 10 things will become 11, then 12 and so on as I continue to make mazes. I hope some of these insights help you as you design and make your own mazes !

Happy Mazing !

I think you will like these similar posts:

A Collection of Maze Design Case Studies to improve your Mazes

Case Study #11 - Making Mazes with Shadows

6 difficult maze puzzles to challenge adults