Previously I’ve shown you how to draw an 11 circuit square labyrinth , a 7 circuit square labyrinth and a 3 circuit square labyrinth. Today we review making any large square labyrinth with the only limit to size the one you choose. Below is a 19 Circuit Square Labyrinth, but you can make one larger if you choose. Let’s get started:
Step 1: The starting seed pattern
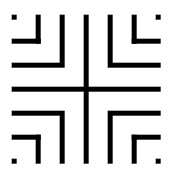
The starting seed pattern to the right is based on an imaginary 6x6 box grid. This seed can become an 11 circuit labyrinth by following the typical construction steps (and it could be both a classic or a square labyrinth). The simple way to make a larger version is to extend the lines additional blocks in all directions to create a larger seed. See below (with 2 new levels making it a 10x10 grid):
Large seed pattern
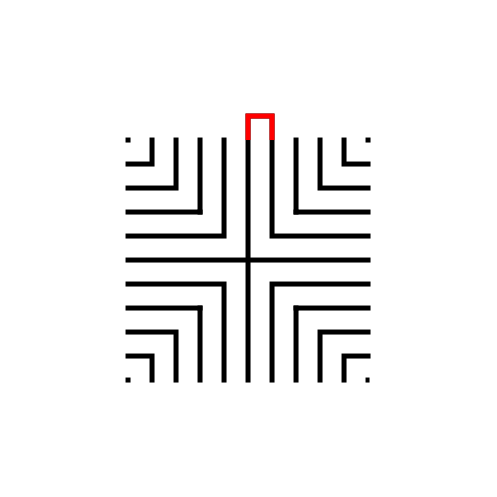
Step 2: Connect the firstline to create the goal
Draw a boxed line from the top of the plus sign to the L directly to the right using that extends 1 grid high. This line will form what will become the goal of the labyrinth.
Step 3: Connect the next endpoint to the left to the next endpoint on the right
Every step from now on will be basically the same. Move one point to your left (moving counterclockwise) and connect that to the next point on the right (moving clockwise). In this case the large backwards L on the top left of the seed pattern to the small L on the top right of the seed.
Steps 4-21: Connect the next endpoint to the left to the next endpoint on the right
I assume you have the pattern down to complete with only pictures with nice red lines. Follow the graphics to complete steps 4-20. Here is the Summary of the connections you will make starting from the seed:
Steps 6 - 21
That completes the drawing of a massive 19 Circuit Square Labyrinth. And now you can go even bigger !
19 Circuit Square Labyrinth
Interested in learning how to make or draw other types of digital mazes ? I have step by step instructions on how to make over 40 different maze types.
If you prefer making labyrinths, you can find step by step labyrinth making instructions.


