How to Draw a 3 Circuit Labyrinth

Drawing a classical 3 circuit labyrinth is both easy and fun once you learn the starting pattern and the rules of building the pathways. Follow this simple 5 step process and draw your own 3 circuit classical labyrinth. If you are more visual (or you are curious to watch) there is a 1 minute video at the end showing the process.

  • Step 1: Draw the starting seed pattern.

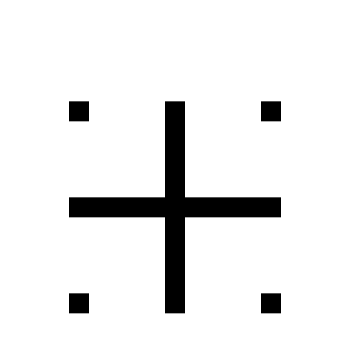
The starting seed pattern is a plus sign with four dots in each of the four corners in the space apart from the lines to form pattern below.

3 Circuit Labyrinth starting seed pattern

3 Circuit Labyrinth starting seed pattern

PRO TIP: Start the pattern on the page in front of you slightly below center and left of center (perfecting this will come with practice). See the example showing your starting center vs. your ending center.

Labyrinth making tip - how to place the labyrinth on the page

Labyrinth making tip

  • Step 2: Connect the first arch (or draw the goal)

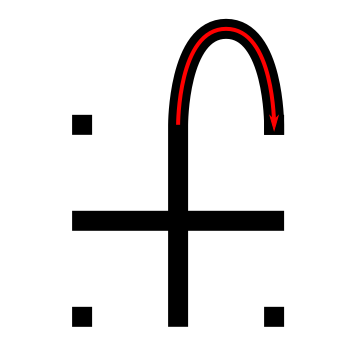
Draw a curved line from the top of the plus sign to the dot in the top right corner of the starting pattern. The top of the arch should peak halfway between those two points. This line will form what will become the goal of the labyrinth.

Making a 3 Circuit Labyrinth  - Step 2 - Draw the Goal

3 Circuit Labyrinth - Step 2 - Draw the Goal

  • Step 3: Connect the next arch from the left

Draw a curved line from the left corner dot to the end point on the right side of the plus sign. Space the line an equal distance from the wall to the inside as you draw the curved line. Notice that you have moved one point to the left and connected that to the next point on the right. This theme will continue for almost all labyrinths you construct.

Making a 3 Circuit Labyrinth  - Step 3 - Draw the next arch

3 Circuit Labyrinth - Step 3 - Draw the next arch

  • Step 4: Connect the next arch from the left

Draw a curved line from the end point of the left side of the plus sign around to the dot on the bottom right side of the pattern (Again, the next on the left to the next on the right). Space the line an equal distance from the wall to the inside as you draw the curved line.

Making a 3 Circuit Labyrinth - Step 4

3 Circuit Labyrinth - Step 4 - Draw the next arch

  • Step 5: Connect the next arch from the left

Draw a curved line from the last remaining dot on the bottom left of the pattern around to the bottom point of the plus sign to complete the labyrinth (see the pattern ?). Space the line an equal distance from the wall to the inside as you draw the curved line.

3 Circuit Labyrinth  - Step 5 - Draw the final arch

3 Circuit Labyrinth - Step 5 - Draw the final arch

That does it. The final 3 circuit classical labyrinth after 5 easy steps !!! If you struggle along the way I suggest you watch the video below which contains a grid structure that may help.

Additional construction option: You have just made a right-handed classical labyrinth. To make a left-handed version change step 2 and connect your first arch to the left instead of the right, then continue reversing the steps and you will create the inverse version of the labyrinth !

3 Circuit Classical Labyrinth

3 circuit classical labyrinth

Notice where the starting pattern is in relation to final labyrinth, not centered, but towards the bottom left, both left of center and south of center.

Here is the quick video showing what we just learned from my YouTube channel ! Notice how the grid structure both guides and helps the construction. If you are wondering the vector graphic program I use in the video is Inkscape, which is open source and available for free to download and use.

A quick video showing the digital drawing of a 3 Circuit Classic Labyrinth

Other posts you may like:

How to make other labyrinth types HERE.

How to make over 40 different maze types HERE.

The 12 Best Maze and Labyrinth Movies Of All Time

The 8 best books about mazes, labyrinths and their history

Before the Mazes

Also known as Before the Mazes - What I Drew.

Some of my first mazes were hand drawn in 9 x 12 Artist’s Sketch pads, but these sketches did not start with mazes initially. I filled the blank pages of the sketch pads with drawings of all types. Pencil drawings of faces. Pen and marker drawings of objects. I experimented with many types looks and techniques. 90% of it was terrible, but 20% of it was interesting, ok maybe 10%. I tended to draw minimal designs with lots of spaces and when I found a look I liked I would use it multiple times. Let’s look at a few of the initial drawings.

A pencil drawing of a head full of ideas

The Unplugged Head. I used pencil to fill a head with thoughts (difficult to see on the scan) and gave it a electrical outlet plug on the back of the neck. The eye you see is in a state of hypnotization. I have always had a problem with Lemmings, not the game, that was great. The followers. This was probably done one day as I was thinking about that. In high school I bought fabric paint and drew this on a white t-shirt that became my favorite thing to wear, because, high school ?

I then started drawing faces made of 1-3 colors drawn with markers, heavily spaced and made of think lines like these. I made dozens of these. I tried to give personalities to faces with drawing them in interesting, happy colors.

contemporary colorful faces made with markers

My next branch led to keeping the colors, but allowing myself to use new line shapes to build more interesting characters. Things were still a bit weird, but I enjoyed spending my time filling large sketch pads with these concepts. Looking back, I always used white space as part of the images. Below are The Native American, Piano Man, and Gee Shucks.

artwork of faces made with markers

I must have bought some colored pencils or the markers started to dry out, because the next set of drawings were all in colored pencil. Let’s call these Awkward Mosaic and Abstract Happy Face. I did these until I moved on to black and white drawings of faces closer to the ones above. Those are so terrible they will not be posted here.

modern sketches and doodles

I have no idea what I was thinking when I drew most of these things, like Awkward in Pajamas below. I do like the right arm bent positioning of the character as they give the gazer a feeling of “What do you think you are looking at?” (exactly they say to themselves).

Pencil sketch of a man called Awkward in Pajamas

Eventually I started drawing cartoons and mini comic strips. I created an alien character that I named Oscar. Oscar, or O.S.C.A.R. of course standing for….I have no idea but the A would be Alien. I must have been inspired by Alf or Third Rock From The Sun because I would put the alien in everyday situations. Eventually those aliens became mazes…which you can read about here !

So that’s how I started drawing. Check out my About Page for more information.

Other posts you may like:

What I use to make my mazes

10 Places Where you can Buy Spectacular Maze Art

The Surprising Benefits of Solving Mazes

Convert a Hand Drawn Maze to a Digital Maze in 3 steps

I used to make all my mazes by hand but now I prefer making digital mazes. Today’s post on converting a maze from a paper drawn maze to a digital maze has 3 parts: Part 1 is the 3 step process to do a maze conversion on your own. Part 2 is the story of how I decided to do a particular project with a completed example. And Part 3 shows you some maze conversion examples I mention in Part 2.

Part 1: HOW TO CONVERT A DRAWING TO A DIGITAL MAZE

This is not a magic solution. You will end up drawing the maze again using this process.

  1. Use a scanner to get the mazes in digital form. (alternatively you can take a picture if you have a steady hand). Now I am assuming this is not a one step process that you want (although it could be for some of you). I am assuming you want a digital vector drawing of your maze that also allows you clean up any stray marks made during the initial drawing. If like most people you do not have a scanner, I used the scanner for free at my local library ! Hopefully you can do the same !

  2. Open the File in Inkscape (or a similar design program)

    I do all of my maze making in Inkscape. Inkscape is a free open source vector graphics editor, but you can use a similar product if you already have the needed skills in that program. I found, that like most programs, Inkscape basics can be learned quickly playing around in the program. You can learn a bit more from YouTube videos, and to finally master it so you aren’t frustrated all the time (While muttering why can’t I just do XXXXX) that will just take time and practice. I just found something a few days ago than I needed for a year. Time and practice are your friend.

  3. Draw the Maze over the Scan

    Here is where the skills come in. Use Inkscape to draw the vector maze on top of the original scan (it will become the background). You can decide if you want to make changes/fixes as you go (as I did for my Alien Mazes above). When you are finally finished, delete the original scan, leaving only the new vector based maze. Now it is easy to write make the maze, and if you do not think you have the confidence, practice and read some of these How to’s. Yes, in reality, Step 3 can actually be broken down into approximately 6 parts for the actual maze construction.

Part 2: THE STORY

When I first started making mazes in high school I drew with pen or markers on paper in Mead art sketch pad books. I mixed the mazes in with other random artwork that I did, switching things up to stay interested. Eventually I decided I liked making mazes and would do many in a row.

For fun I also created my own cartoon character who I would put in funny comic strips, well I thought they were funny. His name was Oscar and he was an alien who lived on Earth. Maybe this was influenced by the tv show ALF. I must have also been inspired by Where’s Waldo when I made the picture below I call An Alien Circus. Check out the great ruled paper ! Good enough to be in an art gallery - NO ! Bad enough to be in an bad art gallery - definitely closer ! But, it was fun to make and made me have to think about different shapes for different characters like the alien elephant and many alien circus clowns.

Hand drawn alien circus scene

Well, after drawing a variety of mazes of various things I decided to combine the two with a maze of my alien character Oscar. Below is his face in maze form, although he does have a full body. I liked how it came out and filled a book with hand drawn Alien mazes, with 44 in total.

a maze of the face of an alien

Looking back they were ok. Most of them look like amoebas more than aliens, but who are we to say what aliens really look like ? (if you are an alien - how did I do?) One thing I do appreciate is that I picked a theme and a particular look and I expanded on it. Since I can’t publish the 3-ring binder of that initial work I decided to do my best to publish it now in a better form. First, I scanned all the files (thank you public library !). Next, I had to split the files into individual files (oops!). Then I opened, named and centered each maze.

I’m going to be honest I was doing a bit of a Marie Kondo when I started this project, trying to rid myself of old papers by digitizing my art, and discarding the papers. Now, in most cases I did discard the paper and digitize the art. But for this, I still have the original hand drawn book of mazes.

This is when I decided I needed to create 2 books. One of the original artwork, with added covers (front and back), and numbered pages, and a second book converting and updating the maze artwork.

To create the conversion book I decided on a few rules:

  1. Make the size of the new maze the same as the original.

  2. Put the entrance and the exit to the maze in the same place as in the original.

  3. Use a simple grid pattern for the maze, not the original pathways. While this changes the look of the mazes, it does make them much more solvable for younger solvers and standardizes their look even more.

  4. Change the color of the walls from Blue ink to black.

How did it turn out ? Well I’ll leave that up to you to decide in Part 3. I think they came out ok. I certainly enjoyed making the digital conversions and hope to do more.

Here is a download for the converted version of the book called The Wild and Wacky Aliens MAZE Book. Obviously, as I mentioned I changed the mazes to be for Kids though I don’t have a specific age. Enjoy !

When I tried to create a book of the hand drawn mazes, but the file sizes where too big to create a book with the resources I have.

Enjoy the free downloadable kids maze book !!

book cover of alien maze book for kids -  The Wild and Wacky Aliens MAZE Book

So that was the story, now let’s look at some examples.

Part 3: 5 MAZE CONVERSION EXAMPLES

Each from the above downloadable book, The Wild and Wacky Aliens MAZE Book. Again, during my conversion I changed the maze pathways from hand drawn medium difficulty to a standard maze construction made for kids. I did this to make the maze difficulty more congruent to the subject matter (aliens).

Example #1:

Alien Maze digital conversion example

And after our first example…do you prefer the perfect circle from digital or the uneven hand drawn ? Notice how I used different pathway widths in the conversion. The mouth is more narrow to give it a darker look.

Examples #2&3:

Alien Maze digital conversion example 2
Alien Maze digital conversion example 3

Much easier version in digital. I like these guys, or uh aliens. Examples #4&5:

Alien Maze digital conversion example 4
Alien Maze digital conversion example 5

Once you have a good handle on how to use a vector design program, converting a maze from hand drawn to digital will become second nature. Good luck !

More posts you may like:

The 10 Most Famous Labyrinths from Around the World

Discovering 7 of the World's Most Interesting Mazes

What I learned using AI to make maze art